Tuesday, April 28, 2020

A How To, by Jitsu: Turning Heavy Bolters into Assault Cannons

This is a tutorial I did for some friends back in the day. For meta reasons, Assault Cannon Razorbacks were very popular, like 6-8 per army popular. Assault Cannon bits did not come with the kit though, and were hard to come by. And so I did this conversion for my roommate, and documented it so I could share the process with you.

Start with a Razorback Heavy Bolter. Note that this will work for almost any Heavy Bolter, though you may need slightly smaller materials.
Next, cut off the barrel and barrel detailing.

Next you will need two different sizes of plastic rod. For each cannon cut five sections of the larder rod and one section of the smaller. Each of the larger rods should be as close to the same size as you can manage, and the smaller one should be a bit shorter.

Glue down a bit of tube to some paper, this is going to act as a guide of sorts. Glue all the rods together as pictured, with the smallest rod in the centre for spacing. Try not to glue anything to the tube.

Repeat until you have enough cannons.

Using a dremel, file, or sandpaper, sand the ends flat. If you had trouble lining the rods up evenly when gluing them together, this step will fix that.

Using your pinvise, drill out the center.

Drill out the stock of the Heavy Bolter too.

Glue small lengths of paper clip into the holes drilled in the cannons.

Mix and flatten a little bit of green stuff, let it cure and then cut into a rectangle. Pure green stuff is best for this, as we want it to be flexible after curing.

Cut that rectangle into equal sized strips.

Carefully glue just the tip of the gs strip to the cannon as shown.

Now glue the rest of the strip on all the way around.

Repeat the process for the second strips.

Now you are ready to glue the cannons on.

Next we build the frame, cut two sections of square rod and glue on as pictured.

Now cut short sections of the larger rod used earlier, and glue on to the front of the frame. 

The finished product.

The conversion next to a GW original, pretty close isn't it?

Now, Assault Cannon Razorbacks are not as in demand as they once were, but I will do more tutorials for more modern conversions of necessity if people ask.

Saturday, April 25, 2020

Grey Knights Psy-rifle Dreads

Way way back in 5th edition when mech was king, Grey Knight dreadnoughts could take psibolt ammunition for 5ish points, increasing the strength of their autocannons to 8. This was stupid strong, and so I built an army around  them. I made a total of five but I can only find pics of the first two I completed.

These were made from Assault on Black Reach dreadnoughts, they were very cheap at the time.
I made the shoulder mounts by casting a plasticard original in old school blue stuff resin putty.
The cannons themselves are two sizes of plasticard rod, and a soft coated wire wrapped around the base for the shock absorbers.


Wednesday, April 22, 2020

Custom Killa Kan

I always liked the ramshackle whimsy of the old killa kans, but I hate working with pewter. A few years ago I tried my hand at converting some from the plastic box set to be more like the old style.

At least on pair of legs from the new box can be cut down to resemble the old school ones.

The pose was a big part of this conversion, pinning the legs in a silly pose that still supports the rest of the model was a challenge. I also nagnetized the weapons, but that was pretty straightforward.

Sunday, April 19, 2020

A How to by Jitsu: Cheap and Easy Lootas

Back in the day I really wanted the full 45 lootas, but there was no way I was going to buy that many kits. I did get one, and I built the lootas and used the spare bits along with some leftover boyz to make the burnas. Then I trimmed their weapons down to just a stock, and added various heavy weapons from my bitz box. Tada, 8 lootas from one box. Then I went a step farther and bought all the burna bits from some local ork players, for around $30.

Here are the results.

I actually like the look of these guys better than the original lootas. This one is a lascannon off a sentinel. 

Heavy Bolter swap.

A Shuriken Cannon from a war walker, this one needed a little green stuff to fit together right.

This is one of my favorites, I looted this design from somewhere  on the net. Its two shootas from the ork boyz kit stacked on top of each other, and the end of the weapon is the barrel of a Tau Fusion Blaster.

Another Shuriken Cannon, but this time in a commical pose. The extra power cable is guitar string.

For these two I scratch built some Assault Cannons. I will be puting up a tutorial on that build at a later date.

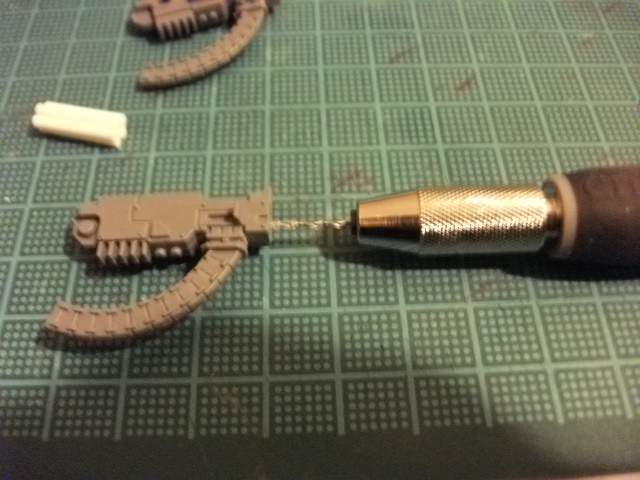
A pair of scratch built Lascannons, these don't need a whole tutorial though. You just use two plasticard tubes, one that fits snug inside the other, and cut the outer tube into appropriate lengths.

One last Lascannon, this time off an old Predator.

And there you have it, double the lootas, for half the price.

Thursday, April 16, 2020

Big Mek with Kustom Force Field from AoBR Nob (Start to Finish)

Here is the finished product, work in progress shots below.

For the base model, I use a plastic Nob from the Assault on Black Reach box set.


First things first, I removed the extra detail on the shoulders, because I will be building them up differently.

Next I start building the shoulder plates, the backpack area, and the under arm.

Added an old Shoota that I think fits the model so far.

At this point I have the basic structure for the arm down, and I have added some pins to anchor the backpack to later.

Filling the arm out the the desired shape and adding some mechanical details.

I went for a classic mek/techmarine vibe for the hand, and added a little plate to his boots.

Swapped the shoota for a more converted one here.

The Kustom Force Field was built a long time ago, so I don't have any WIP pics for it unfortunately. Its made from an old computer resistor (I think), some tau crisis suit bits, smoke launchers, and some plasticard exhausts. Added a few greenstuff straps as well.

I really like the one on the left better in a vacuum, but the right looks better on the model, so I swapped the shoota again.

Added a head that fit well, and some GS goggles.

The base is that diamond pattern industrial steel (in plasticard form).

Super happy about how the clamp arm turned out. 

Rear view of the Kustom Force Field

Tuesday, April 14, 2020

Ork Nob With Converted Power Klaw

This is an old one. Back in the days before plastic Nob kits, it was pretty hard to get enough power klaws and you wanted basically every Nob to have one. And so I have done my share of scratch built klaws. 

Sorry for the low quality picture, its old and I sold this guy long ago.


My next few posts will be old work but I will be posting tutorials later, and I might stream some of my work too.


Introduction

My old blog is gone, this is my new one.

I will be posting some of my older work that I have saved from the old blog here first, then I will be posting my new stuff.

Stay tuned.